Wood Truss & Wall Panels

Louisville, Cincinnati, Lexington, Indianapolis & Southern Indiana

Roof and Floor Truss Supplier Since 1995

Why Trusses and Wall Panels?

Know the facts about building with engineered building components.

Whether you're a single or multi-family builder, or a light commercial contractor, there is no question that you should know the advantages of incorporating engineered building components by Classic Truss into your plans. There have been some amazing technique and technological advancements in the building industry that will not only save you time and money, but will insure a more sound structure.

Why? These components are engineered using the latest technology and cut/built with unmatched precision with very little waste. This not only makes a much stronger structure, but increases efficiency.

Since 1995, the professionals at Classic Truss have worked with top builders all over the region by designing, manufacturing, delivering and installing engineered components such as roof trusses, floor trusses, framed wall panels, i-joists and more. We're here to help you!

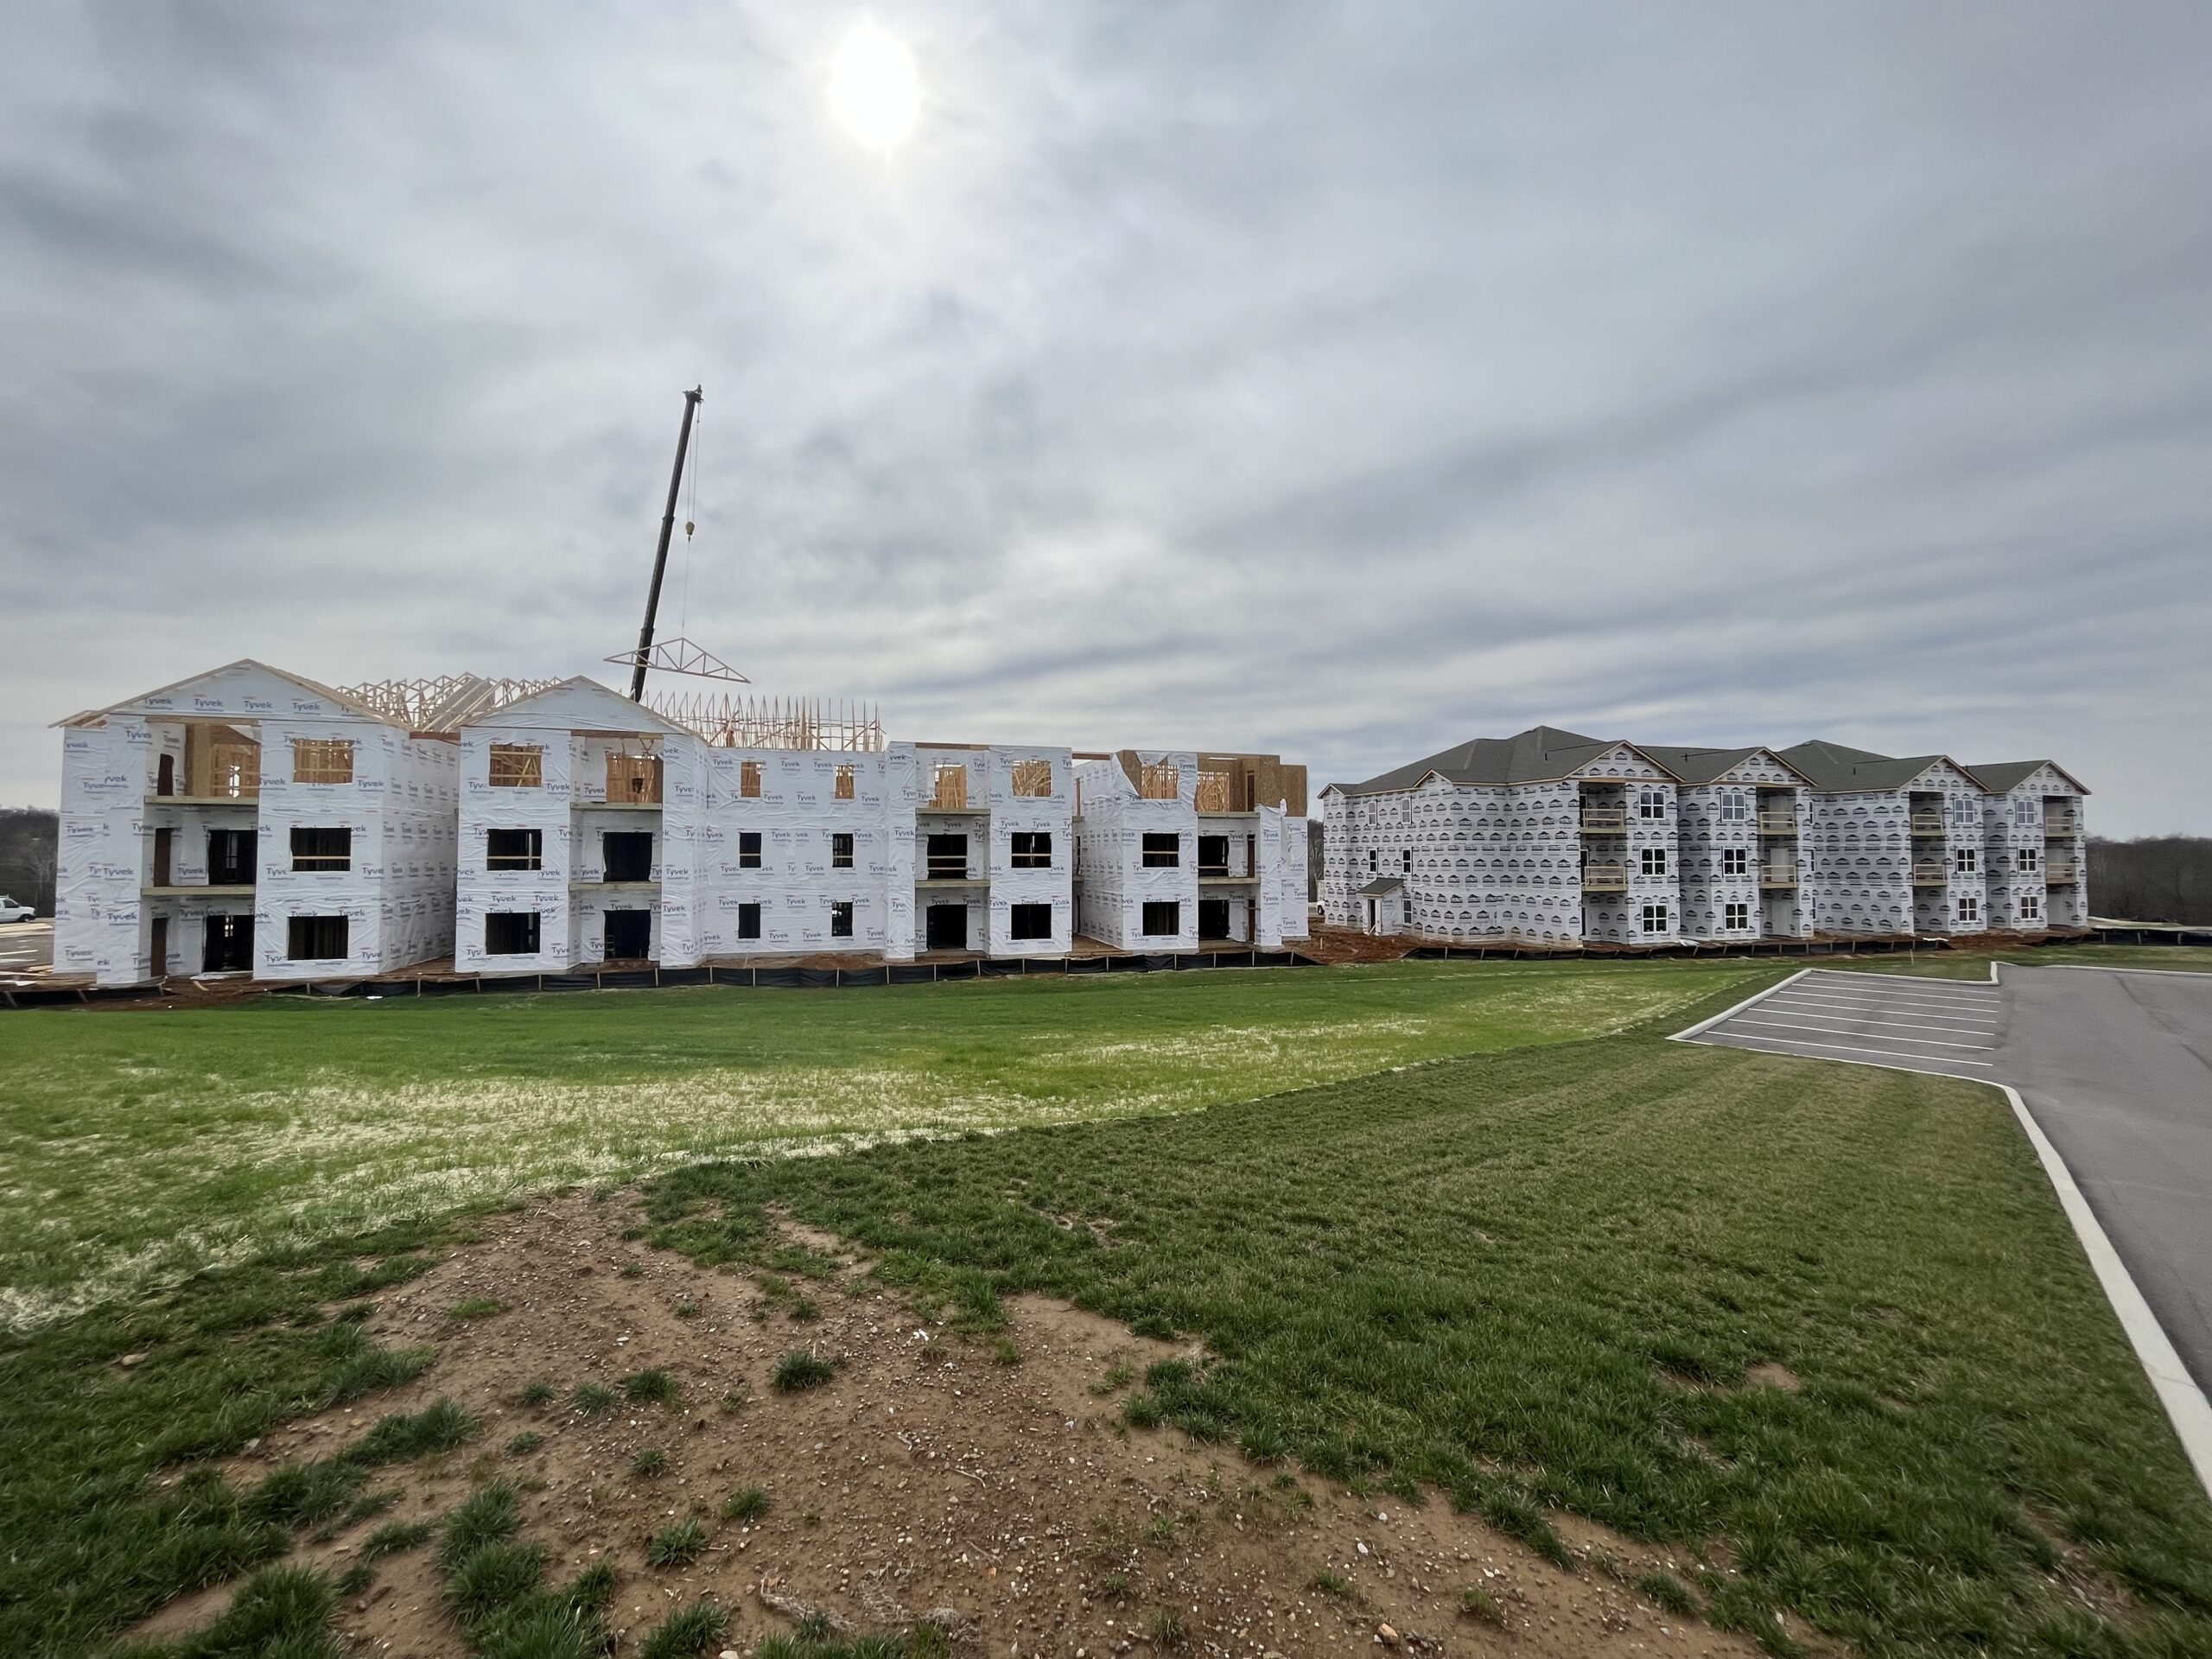
Contact Classic Truss online or give us a call at (812) 944-5821 today to learn how we can save you time and money by making your building projects more efficient and structurally sound and, in turn, making your life easier and business more profitable.

The Future of Framing

What are structural building components?

"Superior products for exceptional homes!"

Structural building components are sections of framing that are assembled in a manufacturing plant before being transported to a jobsite. These components include roof trusses, floor trusses and wall panels.

Structural building components are an environmentally sound, economical framing alternative. Structural building components are created with sophisticated computer technology to build the structure that you desire.

How is using components environmentally sound?

  • The wood used in structural building components is plentiful and readily available.
  • This vital natural resource is renewable and sustainable.
  • Manufacturing components in the shop allows for the most efficient use of lumber.
  • Building with components generates minimal waste - even the cut-offs are easily reused or recycled.
  • Components optimize lumber resources and are designed to precise load carrying capacities.
  • Components can be designed to maximize energy efficiency (e.g. to accomodate the properly rated insulation).
  • Showing the beauty of manufacturing the wood encourages others to use components too.

How are components more economical?

  • When you use lumber more efficiently, you receive greater value from each piece of wood.
  • A quality assurance guarantee is much easier to achieve within the controlled manufacturing environment.
  • Components are ordered ahead of time and available on the jobsite at the precise time the framing crew is ready to install them.
  • Less labor is involved in jobsite assembly, so roofs, floors and walls may be installed very quickly and efficiently.
  • Construction errors or delays are less likely with components.
  • Components do not contribute to waste at the jobsite, so cleanup is quicker and easier.
  • The manufacturing business is more efficient because plants can operate every day regardless of weather.
  • Most importantly, components have a high structural reliability and are engineered to work for a lifetime.

What are the benefits of the latest technology?

  • Computers allow for the design of complex roof profiles and interesting architectural details.
  • Component load carrying capacity calculations are engineered mathematically by computers.
  • In-plant machinery is also computer-controlled and allows for the optimal use of lumber and materials.
  • Trained professional are able to create any structure imaginable. Your only limitation is your own imagination.
  • Components are ideal for wide-open spaces and offer unparalleled design creativity and flexibility.

In addition to the sophisticated design, the economical savings and the environmental benefits, why else should you choose to use structural building components?

  • Every year, more and more smart consumers choose to build with components.
  • Roof trusses, floor trusses, and wall panels are seen as the direction the industry is heading.
  • Conceived in the 1940s, the wood structural building components industry exceeded $15 billion in sales in 2006.
  • Structural building components are highly engineered products that efficiently and cost-effectively meet today's real world construction needs.

Components vs. Stick Framing

"Building with components, I went from having 25 men to 8 men on the jobsite, and I doubled my dollar volume. Every hour I take out of the field decreases my liability, overhead, and worker's compensation. There's no trash to pick up. A clean jobsite makes a safe jobsite. I was a firm believer in stick framing for years, but I'll never go back."

-Rick Thompson, Rick Thompson & Sons, Princeton, IL

Using Wood Trusses and Wall Panels vs. Stick Framing

WTCA (Wood Truss Council), in cooperation with the Building Systems Council of NAHB (National Home Builders), sponsored the Framing the American Dream® project to better understand wood framing. It was the first time two identical house plans were completely framed using two different methods - one stick built, and the other with wood trusses and wall panels (structural building components). Here's what we learned:

Craftsmanship Through Engineering
  • Every building is an engineered structure. The moment a nail is driven into two boards, load transfers from one board to the other, so designing and engineering all structures is important. A house using components is fully engineered.
  • Each component is designed specifically for your building.
  • Each component location is defined, making components easy to use in the field.
  • All the loads go where they belong. You won't have uneven floors, or windows and doors that don't close property - no surprises!
  • Classic Truss engineers each component with computer software making craftsmanship, and gives you design flexibility.
Craftsmanship Through Manufacturing
  • Classic Truss' facility creates quality components, starting with computer-controlled saws, which make accurate compound cuts simple. All component joints fit together tightly in precision jigs. Using our new laser-guided setup even the manufacturing is computer controlled for faster setup times and efficient production.
  • Weather is not a factor. Production can continue day and night, providing consistent quality.
  • Material shortage delays are less likely, since the entire system is supplied in one package.
  • Callbacks are reduced. Components made with dry lumber are less likely to shrink, warp and twist.
  • Components are rarely stolen from the jobsite.
Floor truss framing Floor Truss Framing
  • Floor trusses can be manufactured in long spans, reducing or eliminating the need for intermediate bearing walls, beams, columns or footings.
  • The open web design of floor trusses allow for easy passage of ducts, plumbing and electrical wires within the system. No cutting of webs is required and you don't need to fur down to hide mechanicals.
  • Special bearing, cantilever and balcony details are easily built in.
  • Stiffness can be designed into the floor truss, creating a more solid floor.
  • Labor costs for mechanical contractors are lower.
  • The 3 1/2-inch width allows for quick gluing and accurate nailing or screwing.
  • Cold air returns can be eliminated by using the open web system as a plenum for air distribution.
FLOOR TRUSS FRAMING
 
Stick Frame
Components
Man Hours
38 Hours
12 Hours
Quantity of Lumber
4,256 Bd. Ft.
3,147 Bd. Ft.
Savings: 26 Hours · 1,109 Bd. Ft.
Roof Truss Framing
  • Complex roof and ceiling profiles are easy to design with today's software.
  • Hip and valley roof systems are much easier to build using trusses than with even conventional framing.
  • Roof trusses can easily be used with a variety of on-center spacing, to optimize strength and lumber resources.
  • Long clear spans are easy to create, reducing or eliminating the need for interior bering walls, beams and columns.
  • Structures are dried in more quickly, saving time and avoiding weather-related delays.
  • Your imagination is the only limit when you design with trusses.
Roof TRUSS FRAMING
 
Stick Frame
Components
Savings
Second Floor
Man Hours
142 1/2 Hours
59 1/2 Hours
83 Hours
Quantity of Lumber
7,210 Bd. Ft.
4,875 Bd. Ft.
2,335 Bd. Ft.
Great Room
Man Hours
104 Hours
35 1/2 Hours
68 1/2 Hours
Quantity of Lumber
3,641 Bd. Ft.
2,116 Bd. Ft.
1,525 Bd. Ft.
Valley Framing
Man Hours
9 1/2 Hours
4 1/2 Hours
5 Hours
Quantity of Lumber
692 Bd. Ft.
362 Bd. Ft.
330 Bd. Ft.
Wall Panel Framing
  • Wall lumber use can be optimized with studs designed at the optimum spacing for the applied roof and floor truss loads. Generally, less lumber is required.
  • Placement plans are generated and delivered with each framing package, picking up all bearing locations and showing correct locations, for easy setting. Each wall panel is marked accordingly.
  • High quality material is used.
  • Walls are square.
  • Proper nailing patterns are used.
  • Studs and headers are designed to support applied loads.
  • Sheathing can be applied in the factory, saving time in the field.
Wall Panel FRAMING
 
Stick Frame
Components
Man Hours
93 Hours
26 1/2 Hours
Quantity of Lumber
4,598 Bd. Ft.
4,598 Bd. Ft.
Savings: 66 1/2Hours · 0 Bd. Ft.

Environmental Responsibility

  • Nearly five million trees are planted every day. Wood is the only renewable building material.
  • Wasting wood is costly. At Classic Truss, cut-offs and short lengths can be used to the maximum, which reduces waste. Most waste wood is ground up and sold, so less goes to the landfill.

What did we learn here?

TRUSS & Wall Panel FRAMING Vs. Stick Framing
 
Stick Frame
Components
Savings
Total Jobsite Man Hours
401
148
253
Total Cost at $20/hr Average
$8,020
$3,460
$4,560
Total Bd. Ft. Lumber
20,400
15,100
5,300

Total Cost of Lumber at $450/1,000 Bd. Ft.
vs. Component Selling Price

$12,928
$14,457
$1,529
Total Scrap Lumber Generated
17 Yards
4 Yards
13 yards
Total Cost of Scrap Removal at $15/Yd. Dumpster
$425
$100
$325
Total Cost for this 2,600 Sq. Ft. House
$21,373
$18,017
$3,356

Use of wood trusses and wall panels resulted in a 16% saving in total labor and material costs.

"You have to look at the bottom line, and the bottom line is that you save money with building components. You pay more for a truss, but you can put it in so much faster. Time and man power are very difficult to come by. Using components, you can take the same man power and do so much more work"

- Roy Wilder, Wilder Construction, Middlesboro, KY

Roof Truss Facts

Roof Truss Types and Configurations

Truss Terms

When working with trusses there are a few terms you should get to know. These are the aspects of trusses that insure that the components will fit your structure and is engineered to withstand the required loads.

The terms below are typically used to describe the various parts of a metal plate connected wood truss. The truss profile, span, heel height, overall height, overhang and web configuration depend on the specific design conditions and will vary by application.

Types of Roof Trusses

There are two basic types of trusses. The pitched or common truss is characterized by its triangular shape. It is most often used for roof construction. Some common trusses are named according to their web configuration, such as the King Post, Fan, Fink or Howe truss. The chord size and web configuration are determined by span, load and spacing. All truss designs are optimized to provide the most economical application.

The parallel chord truss or flat truss gets its name from having parallel top and bottom chords. This type is often used for floor construction.

Truss Configurations

The following examples represent some of the possible variations on the basic types of trusses. The only limit to the design is your imagination.

Floor Truss Facts

Builders are discovering that floor trusses are the solution to many of their floor framing problems. Floor truss installations create high quality, squeak-free construction with the added benefits of reduced framing time, waste, pilferage and callbacks. Design versatility and open web spaces are tremendous advantages to builders of today's complex and sophisticated homes.

Engineered floor trusses are more stable by nature because of how they are built. They generally have a flat 2x4 surface crating a wide nailing/gluing surface and generally making them easier on which to work. Additionally floor trusses allow for wider spans, more space for HVAC and plumbing components and versatile enough to handle just about any unique situation you may run into.

Floor Truss Fact Sheet

  • The fact that floor trusses are built with 2x4s or 2x3s orientated "flat-wise" means a wide, stable bearing surface that is easier to work on and around.
  • The wide nailing surface provides for easy gluing and quick, accurate attachment of sheathing, reducing squeaks and improving floor performance for the life of the structure.
  • Spacing floor trusses at 19.2" or 24" on center maximizes structural efficiency and speed of installation.
  • Stiffness and strength can be designed into the floor truss, creating a more solid floor.
  • Special bearing, cantilever and balcony details are easily built in.
  • Shrinkage, warping, or twisting are minimized, reducing the potential of callbacks to the job site.
  • Long spans and girder truss options reduce the need for immediate bearing walls, beams, columns or footings saving time and construction costs.
  • The open web configuration leaves plenty of room for plumbing, electrical, and mechanical runs.
  • Typical depths for floor trusses are 12" to 24" but shallower or deeper configurations are possible.

While floor trusses may cost more per linear foot of material, overall you save more money due to the reduced installation time and wasted material. Click HERE to see how efficiently a trussed floor could be installed on a 2,600 sq. ft. house as it compares to a traditionally built home.

Standard Floor Truss Structure details.
Courtesy of WTCA - Wood Truss Council

Building with Wall Panels

WTCA (Wood Truss Council), in cooperation with the Building Systems Council of NAHB (National Home Builders), sponsored the Framing the American Dream® project to better understand wood framing. It was the first time two identical house plans were completely framed using two different methods - one stick built, and the other with wood trusses and wall panels (structural building components) exclusively.

Framing the American Dream® Results
 
Man Hours
Lumber
Stick Frame
93 Hours
4,598 Bd. Ft.
Components
26 ½ Hours
4,598 Bd. Ft.
Savings: 66 ½ Hours · 0 Bd. Ft.

Considerations for Building with Wall Panels

In our project, the wall designs were not optimized, with studs designed at the specific spacing required for the applied roof and floor loads. Generally, with proper planning and a fully engineered design, less lumber will be required for most projects which utilize wall panels.

  • Placement plans greatly simplify the wall panel installation process by clearly identifying each panel and its correct location.
  • Material quality is controlled and you are assured the use of high quality material.
  • Walls are square.
  • Proper nailing patterns are used.
  • Studs and headers are designed to support applied loads.
  • Sheathing and building wrap can be applied at the time of manufacturing saving time in the field.

Many dimensions that are necessary for the successful use of wall panels are not on the plans. To maximize wall panel efficiency take a few minutes to review this checklist. Because of the precise engineering and panel design involved Classic Truss will need to know this information before manufacturing your panels. We can help you determine these answers from your building plans.

Heights

  • Are wall heights nominal or standard?
  • Provide all elevations. Different ceiling heights do not necessarily mean different all heights.
  • Are there any short walls (e.g. around the stairwell)?
  • Are there floor level changes requiring changes in wall height?
  • What are the garage foundation curb heights?

Openings

  • What are all the rough opening sizes?
  • Are transom/half-round windows shown clearly over windows and doors?
  • Who is the exterior door manufacturer and what is the exterior door type?
  • What are the door rough opening sizes?
  • What is the tub clearance? This is best expressed as the overall stud-to-stud distance.
  • What is the fireplace chase wall height and sheathing?
  • What is the stair rough opening size?
  • What is the interior door and window casing width? With wide trim, additional clearance may be needed between the rough opening and perpendicular walls.

Headers

For garage and window headers at the same location as house windows, increase the height of the garage window by the difference between the height of the house foundation and garage floor.

Garage door and swinging door headers are located at their "standard" heights, unless garage walls are to be set on a masonry curb wall that extends above the height of the garage floor.

General

  • Should the wall panels be built as drawn or as reversed?
  • Are dimensions out-to-out of stud or out-to-out of sheathing?
  • When the plans reference brick or stone, be sure to supply all necessary dimensions. Often the plans do not indicate the distance from the face of the brick to the face of the stud.
  • What are the header sizes for interior bearing walls?
  • What is the wall sheathing type?
  • What is the corner bracing type?
  • Should Classic Truss provide treated bottom plates for installation on concrete or masonry?
  • What are the placement dimensions for all interior walls, including skewed walls?
  • Will there be multiple studs for concentrated loads from girders, beams, etc.?
  • Will there be pockets for racks/beams? What are the location, size and elevation of these pockets?

Don't worry too much if you need help determining some of the items above. Classic Truss and Wood Components is here to help. We understand the industry and can help you every step of the way!

Recommended Procedure for Installation of Wall Panels

Although we have shown how using wall panels in your structure can be beneficial there is a procedure to follow that will make your project go much more smoothly. Over the years Classic Truss has learned from hundreds, if not thousands, of past wall panel projects exactly how to install these components in the most efficient manner possible.

In most cases Classic Truss installs the wall panels the we manufacture. This is what we call our turn-key solution and will assure efficiency and accuracy. However, if you have a framing crew that you would like to use then, for your convenience, here are a list of the basic steps. This list is to give you a better idea as to how a home built with wall panels is constructed on the jobsite and by no means should be a considered and exhaustive list .

  • Step One: To get the greatest benefit out of wall panels it is absolutely critical to start with a foundation that is level and square. Anything less will reduce the economic benefits that can be gained through the use of wall panels. If the foundation is not level or square, plan for any adjustments before the panels are manufactured. It may be necessary to start wall panel placement at the center point of the foundation, to equally adjust for any measurement error.
  • Step Two: Note all measurements required before installation. (See checklist above.)
  • Step Three: Measure the sub floor or slab. Compare this measurement with the dimensions on the placement plans. Check for all floor openings (e.g. stairway, fireplace, etc.)
  • Step Four: Review the wall panel stacks that were delivered and adjust them for placement. Although we try to determine in what order you will need each wall and stack them accordingly, we may not always succeed exactly. Sometimes we have to stack the walls so that they can be safely delivered to your jobsite.
  • Step Five: Chalk a line at the inside face of the exterior walls.
  • Step Six: Write the panel numbers on the floor, following the wall panel layout, in order to indicate the location of each wall panel.
  • Step Seven: Set the two exterior wall panels and fasten together tightly. Nail the wall panels together at the top, middle and bottom of the end studs.
  • Step Eight: Brace each wall panel as it is set. Use 2x4s anchored to the floor or ground to stabilize each wall panel. This very important for wall stability.
  • Step Nine: Continue setting additional wall panels leaving a couple of exterior wall panels out, to allow the interior walls to be brought in. A few important details to keep in mind:
    • It may be necessary to shim to compensate for slab or sub-floor issues. Shim so that there is full contact between the wall panel and slab or sub-floor.
    • Extra caution is required with walls that have plumbing (water).
    • If the sub-floor slopes and you "rack" the walls to get the studs vertical (plumb), the openings will no longer be square.
    • Long, end-to-end runs of wall panels MUST be butted together tightly by hand or mechanical means or the run will be too long. This can often be compensated for up-front by purposely under sizing each wall panel by 1/16" or even 1/8".
  • Step Ten: Continue setting interior wall panels working from the farthest end toward the opening of exterior wall panels that are not yet set.
  • Step Eleven: After setting all interior wall panels, finish setting the remaining exterior wall panels.
  • Step Twelve: Install the upper top plates. Whenever possible, overlap top plates by at least one stud spacing.
  • Step Thirteen: Check all fastenings at joints, and add additional bracing as necessary to maintain wall stability.

Talk to Classic Truss about our complete turn-key framing packages and let us not only manufacture your wall panels but let our experienced framing crews install them for you.